 A few words before we begin. Don't rush to throw away broken or simply old washing machines; they can be reused, for example, by making a simple lathe yourself.
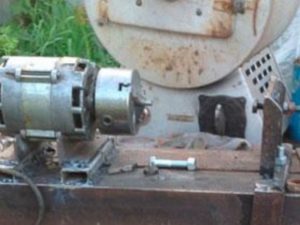
A "homemade" wood lathe is made from a washing machine motor. Its design is incredibly simplified, so it can't perform all the functions of an expensive lathe, but it handles the basic tasks with flying colors.
What types of motors are there in washing machines?
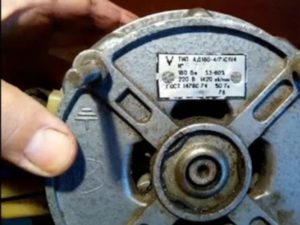
To make a homemade lathe, you'll need a motor from an old washing machine. First, it's worth understanding what types of motors there are.
 Asynchronous – these come in two or three phases. Two-phase motors are often found in older washing machines manufactured in the Soviet Union. Three-phase motors are found in more modern models.
A brushed motor is a small motor that runs on either DC or AC current. Its advantages include variable speed control. Its disadvantages include brushes, which wear out quickly but are easily replaced.
Modern direct-drive motors are now found in most automatic washing machines, primarily those made in Korea.
The lathe consists of three parts: the motor itself, the tool rest, the headstock and the tailstock.
Details
Materials and equipment for making a homemade lathe
So you will need:
– A 400W motor with 3000 rpm is sufficient.
– Boards for the base of the machine
– Nuts and screws, bearings.
- Corner
List of tools:
- Drill.
- Bulgarian.
- Welding machine.
– Marker, tape measure, ruler.
Instructions for creating a machine
Let's take a detailed look at how to manufacture each part and assemble the machine.
First step. Headstock.
The machine's operating parameters depend on this component, so the headstock must be reliable. A 300 x 265 mm frame is fabricated from a 140 mm channel, and the entire structure must be welded together at a 90-degree angle. The bearing housing is slotted on the smaller side. The housing is then installed through these holes on a paronite gasket and secured with bolts. It's best to remove the seal and install a thrust bearing instead.
Prepare separately: For the belt, it is necessary to make a pulley with a diameter of 70 mm, as well as a shaft, but prepare places for bearings on it in advance.
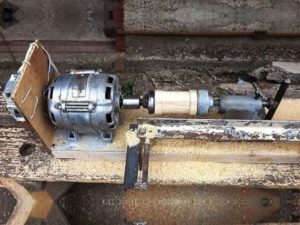
Install the washing machine motor mounting bracket inside the channel. Slide the motor along the mount, tightening the poly V-belt. Attach the rear of the motor to the channel as well.
Step two. Tailstock.
The main element that allows the wooden workpiece to be clamped to the headstock. The quality of this element determines the performance of the lathe itself, and the length of the extension element determines the size of the finished parts.
 Using four metal strips, connect two 140mm wide channels. Weld two partitions to the bottom of the housing. Weld one bushing to the partitions, and secure the other with two screws. The bushings are 14 x 20mm. Fabricate a shaft for the bushings with the following dimensions: 20mm in diameter, 14mm at the edges, and offset by 2mm in the center. The shaft needs to be able to rise and fall during rotation; check this during installation. Ideally, there should be a 4mm gap at the top and bottom to allow for clamping and lowering the headstock. Weld two pieces of pipe (30-20mm long and 21-23mm in diameter) to the heads of the M12 bolts. Use 3-4mm thick wire to weld the two pipes together. Make a handle on the end of the shaft that extends from the bushing.
The assembled device should look like this:
The plates need to be tightened with bolts to secure them to the support. This design, with the handle adjusting the dimensions, allows you to quickly select the machine settings for processing different parts.
Caution: Remember safety precautions during any work.
Step three. Quill with a rotating center.
The quill is made from a 30 x 30 mm square tube. Mill the faces to 29 x 29 mm. Secure the tube at one end with an M12 nut and a 12 mm long counter rod. Add three straight bearings to the rod and press them in place. Now we need to make a housing from the same 29 x 29 mm tube. Close one end of this tube tightly, and weld a nut with an eye to the other end, in the cross-section, so that the quill can be secured with a bolt. Prepare a stud; apply an M12 thread to one end and an M8 thread to the other. Screw the flywheel onto this end and secure it with a nut of the same size. Connect the quill and tailstock using two pieces of angle iron, welding them together. It's a matter of adjustment; it's necessary that the rotation axes coincide: the central tailstock and the front spindle axis.
Step four. Handbook.
Attention: The quality of manufacture of this part determines how convenient and safe your machine will be to operate.
To do this, you need to make an eccentric clamp, then the tool rest will be freely adjustable and securely fastened.
We take the armature rod and make two 26mm diameter bushings with flanges. We drill 14mm and 10mm holes inside the bushings, offset 2mm from the center. To secure the bushings, we drill threaded holes at the larger end. For the rod body, we take a slightly larger piece of pipe and weld a rod with an M12 thread to it. For mounting, we use an 80mm by 40mm channel. Two partitions with holes are welded inside, and 19mm long, 26.5mm diameter bushings are welded into these holes. To ensure the rod can rotate freely, the structure must have some play.
To secure the rod, a piece of pipe is welded to the tool rest. The pipe is cut at both ends, and a bushing and nut are welded in place. Thus, by turning the bolt, you raise the tool rest.
The starting device is made using a car engine and connected.
Step five. Test.
Afterword
So, you've built your own wood lathe, all that's left is to test it out, and perhaps you'll want to improve it in some way.


