 One of the best helpers in the home is the washing machine. It makes a woman's work easier, freeing her from at least the task of doing laundry. If the family is large, laundry must be done every day to keep the apartment clean and the residents' hygiene. Therefore, a broken washing machine is a real problem for a woman.
All the laundry weighs heavily on her shoulders. And so she begins washing all this laundry and clothing by hand, wasting time and energy. And so it goes, every day, dreaming of a new washing machine or a quick repair of the old one. But there's no money for repairs.
So what should we do? We need to find a way out of this situation. If your husband is handy, he can figure out the cause of the breakdown and replace the faulty part with a new one. Today, we'll tell you how to disassemble an LG washing machine, or any other model.
Tools for disassembling a washing machine
Car brands They differ from each other in some features: washing programs, sizes, number of revolutions, but the principle of disassembling washing machines is the same.
To disassemble an LG washing machine, you need to arm yourself with a number of tools.
For high-quality and fast disassembly you will need: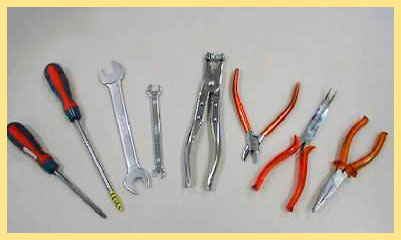
- two screwdrivers - a thin flat head and a Phillips head for unscrewing fasteners;
- round-nose pliers or flat-nose pliers;
- awl;
- hammer;
- open-end and socket wrenches;
- pliers;
- nippers.
How to disassemble an LG washing machine yourself
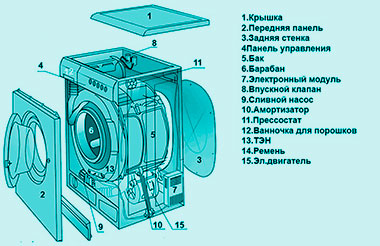
The internal parts of the device are protected from negative environmental influences by metal body elements: the back wall, front panel, and top cover.
- Before disassembling the washing machine yourself, unplug the power cord to disconnect it from the wall outlet and protect yourself from electric shock. Turn off the cold and hot water supplies.
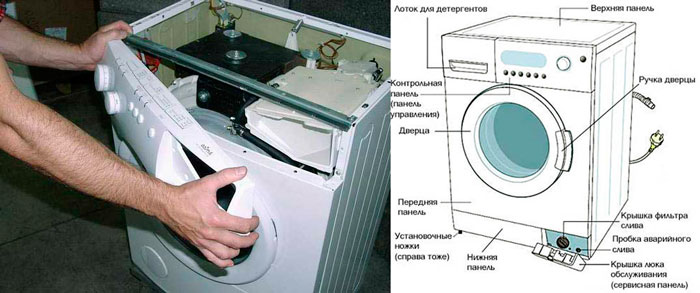
- Unscrew the two screws at the top, then pull the top cover slightly toward you, lift it up, and remove it. The back of every LG washing machine has a service hatch that's almost as long as the back wall. Therefore, to access the components underneath, you don't need to remove the back wall. Instead, simply unscrew the fasteners around the entire perimeter of the service hatch and remove it.

- Next, you need to remove the control panel so it doesn't interfere with disassembling the unit. To do this, pull out the detergent drawer. There are two screws underneath; unscrew them with a Phillips-head screwdriver. Then, use a flat-head screwdriver to pry up the top latches holding the control panel and remove them. They will make a slight click. Then, release the bottom latches by pulling the panel toward you and lifting it upward until you hear a click. You don't have to remove the control unit completely; instead, slide it toward the side panel and secure it there with tape.
- Extract drum cuffTo do this, open the door, press the clamp spring, and pull it off. The LG washing machine model only has a spring holding the clamp in place; there are no tricky latches or teeth. Hide the rubber band deep inside the door after removing it.
- Open the hatch in which the filter is hiddenRemove the bolts on the right and left sides of the filter and remove the front lower panel, also known as the false panel. Now nothing is blocking the front panel from being removed: neither the control panel, nor the seal, nor the door.

- Unscrew the bolts at the top and bottom of the front panel. The door lock is located on the front panel and is connected to the rest of the machine. Slide your hand between the front panel and the appliance body. We can reach the wire through this gap and pull it out. Alternatively, unscrew the door lock from the front panel.
- How to disassemble an LG washing machine pump
It is easy to remove the drain pump from an LG washing machine.
To do this, lay the unit on its side and remove the pump through the bottom, having first disconnected the wires. To remove the drain pump, loosen the screws and detach the clamps. To do this, press the latches with pliers and disconnect the drain hose and fitting.
To disassemble the pump, remove the screws from the spool. Clean the spool of any dirt and slime.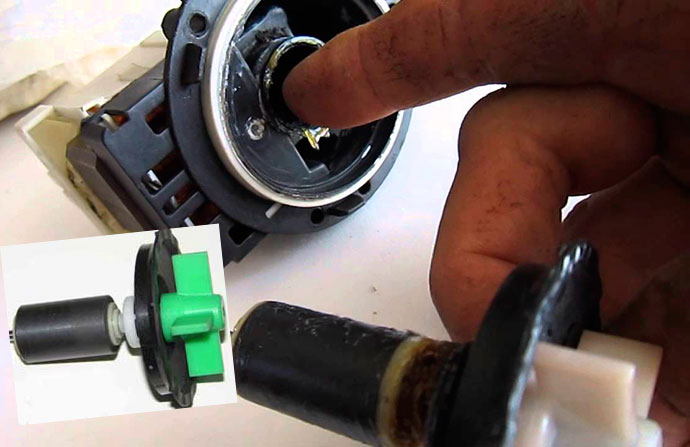
Pay attention to the impeller, spin it on the shaft, whether it rotates, whether it has any damage. If it is broken, replace the impeller with a new one.
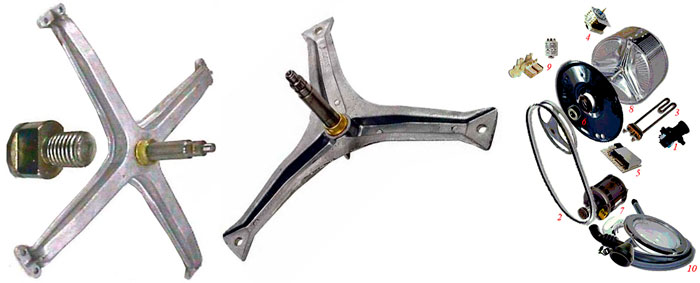
Also check the rubber seals. If any are cracked or torn, replace them. Next, pry the latch with a screwdriver and remove the motor from the coil. Remove the monolithic spider by heating it with a heat gun. Then, pull the magnet off the shaft.
After this, clean all pump parts, remove any dirt, and inspect the bearing. Lubricate it. If it's broken, replace it. Begin reassembling the drain pump using the photo you took before disassembling it.
How to disassemble the loading tank of an LG direct drive washing machine
So, we've removed all the panels: the front, rear, and top covers, as well as the control module. Now we'll tell you how to disassemble the loading tank of an LG direct-drive washing machine.
Why do you need to remove the drum and loading hopper? Typically, the drum is disassembled to replace bearings or seals.
This service is the most expensive because the machine must be completely disassembled. The bearing and seal are located at the rear of the drum. To determine whether the bearing is faulty or not, rotate the drum by hand.
If you hear a creaking and humming sound, it means the bearing is not working and needs to be replaced.
As soon as you buy your LG washing machine, you should immediately install it on a level surface, adjusting it to ensure even load on the bearings. If you see a leak at the back of the tub, the seal has failed.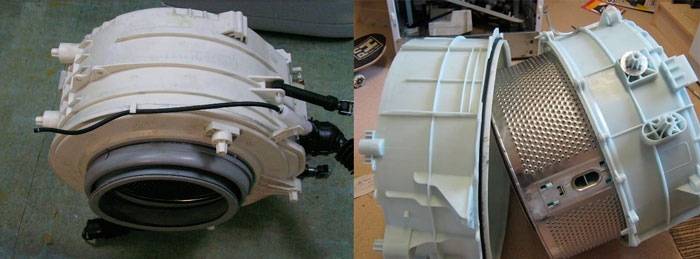
To access the bearing, you need to completely disassemble the drum. Replace the part with a new one from this specific model. Bearings from other machines cannot be used, as they will not fit. When purchasing a bearing from a store, pay attention to the integrity and quality of the part.
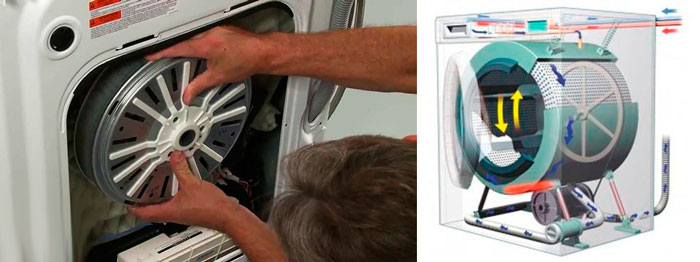
Direct Drive is a new technology used by the Korean company LG. It extends the life of the washing machine because it eliminates the need for a drive belt.
The machine works quietly. In washing machines of this brand, the motor is located at the back of the loading tank, and not at the bottom, as in other machines.
- To remove the drum without difficulty, you need to remove the counterweights. Unscrew the bolts at the upper counterweight, remove it, do the same with the lower counterweight.
- There are hoses at the top of the tank. They need to be removed. Use a Phillips-head screwdriver to loosen their fastenings. Loosen the clamps and disconnect the hoses from the tank.

- At the bottom of the tank you also need to disconnect thermistorPress the connector latch and remove it. Use wire cutters to cut the zip tie connecting the thermistor to the wires leading to the heating element and ground contact.
- The grounding contact is secured with a 10 mm nut. Unscrew the contact with a 10 mm head.
- Disconnect all components connected to the washing machine drum, including the heating element, drain pump, and motor wires. Disconnect the terminals that connect the sensors to the drum and set them aside.
- Disconnect the water level sensor pipe and the pipe from the tank drain pumpso they don't interfere with the drum removal. To do this, use a Phillips-head screwdriver to loosen the clamp that holds the hose to the drum. After releasing the spin, disconnect the hose from the drum. These hoses connect the loading drum to the rest of the machine.
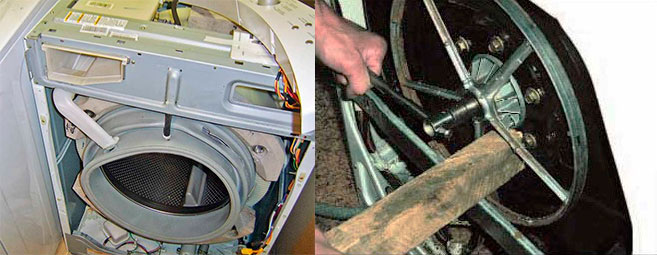
- Remove the screws securing the pressure chamber. Next, use a 16mm socket to loosen the rotor nut. You'll need to hold the rotor while doing this, as the bolt is difficult to remove. If you still can't remove the bolt, have someone hold the drum inside.
- Remove the rotor. The stator is located underneath, secured with several bolts. Use a 10mm socket and remove each one.
- After removing the last bolt, hold the stator to prevent it from falling and getting damaged. Remove the stator by lowering and tilting it. Disconnect the connector retainer, then the connector. Remove them from the stator. The tank and drum are now unattached and supported by shock absorbers and springs.
- Now you need to remove the pins that hold and connect the shock absorbers. They have two locking tabs. Take a 13mm socket and slide it onto the pins until the tabs are compressed. Then pull the pins out with pliers. Now the shock absorber can be removed from the tank.

- Next, remove the springs. They have a cap that prevents them from slipping off the hopper. Use a flat-head screwdriver to pry the cap off and then remove the springs.
- Disconnect the loading tank from the springs and place it with the pulley facing up. The engine comes off with the tank.
- Unscrew the motor. Take out the tank.
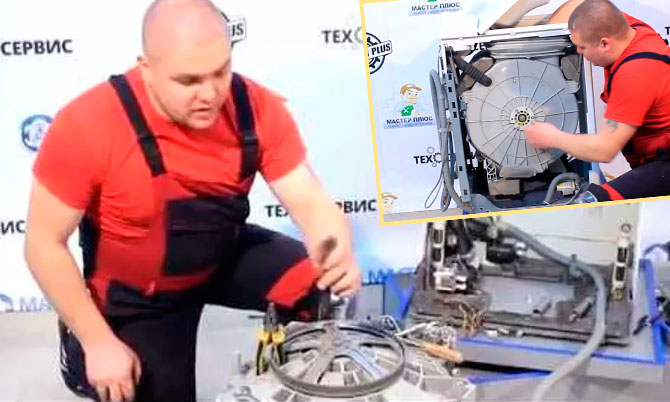
- Place it on wooden blocks with the pulley facing up and use a 10mm socket to remove the bolts. Now one half can be easily lifted. Use a screwdriver to help it separate faster. Inspect the top half of the tank for cracks or chips. If so, the top half of the tank can be replaced. Try to pull the drum out of the other half of the tank. If it won't come out, turn the tank over and tap the drum out. A bearing may be stuck in it, preventing the drum from coming out of the tank.
- To do this, place the inverted drum on wooden blocks with the plastic part tapping against the drum shaft. Before doing this, pour penetrating lubricant into the seat and let it soak for a minute.
- Take a wooden block and place it on the shaft to prevent damage when hitting it with a hammer. Hit the block of wood and the shaft with the hammer. The drum will pop out.
- Remove the other half of the tank. Examine drumIf it's okay, then put it aside, we don't need it yet.
- Turn the loading tank half over and use a flat-head screwdriver to pry out the seal.
- Remove any dirt. Then, lubricate the bearing's edges with penetrating lubricant to make it easier to knock out. Excess oil should be wiped off afterwards to avoid weakening the tank material. Hit the bearing, first the bottom one, with a hammer. Then turn the tank over and knock out the other bearing from the opposite side.

- Once the bearings are removed, use a nylon or brass brush to clean off any dirt from the bearing seat. Avoid using a wire brush for this purpose, as it will damage the tank. Before reinstalling the bearings, lubricate the edges with liquid soap to make them easier to install. Place the new bearings in place and tap them in with a hammer.
Today we showed you how to disassemble an LG washing machine with a direct drive, sharing our knowledge on how to remove the top cover, rear and front panels of the device, and the control model.
We told you how to disassemble the loading tank so that replace bearings and seals, how to remove the drain pump from the washing machine, disassemble it, and clean it. Now you know how to repair the device so you don't have to pay a fortune for a complete disassembly and rebuild.


12 kg True Steam Skis: How to Remove a Leaking Engine